Right now is the single best window of the year to get on your RV roof. Summer has already done its worst to your sealant, and the fall rains have not arrived yet. If you wait until the first real storm to find out your roof is compromised, you are no longer paying for a reseal — you are paying for rot repair. Here is how to check your roof properly, and what we find most often on rigs around Kyle, Buda, San Marcos, and the rest of Central Texas.
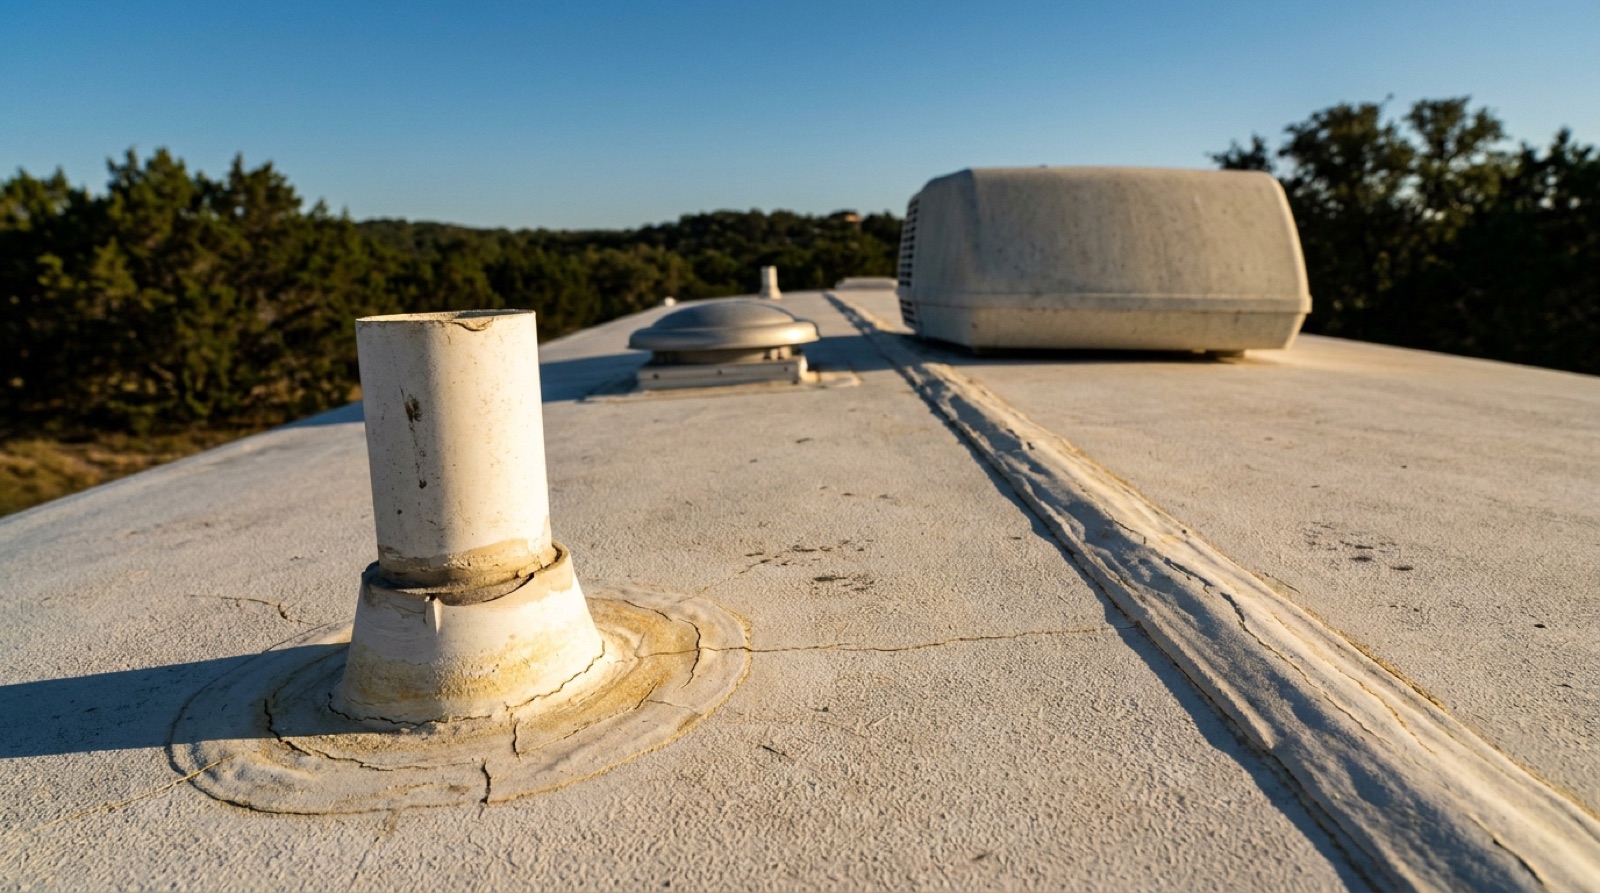
Textbook late-summer sealant: chalky, yellowed, hairline cracks along the seam, and shrinking away from the base of the vent.
Why Texas Destroys RV Roof Sealant Faster
Most RV manufacturers suggest inspecting roof sealant once a year. That guidance is written for a national average, and Central Texas is not average. Between relentless UV, months of triple-digit surface temperatures, and the daily expand-contract cycle as the roof heats and cools, sealant here ages considerably faster than the manual assumes.
What that looks like in practice: sealant goes chalky, shrinks away from the edges of a fitting, and develops fine cracks. Those cracks are often too small to notice from the ground and too small to leak in light rain. Then a proper Hill Country downpour arrives and water finds every one of them at once.
A Small Leak Is Never a Small Repair
This is the part RV owners consistently underestimate. Water that gets past your roof does not drip neatly into the middle of the floor where you would see it. It travels along the roof decking, down inside the wall cavity, and soaks into framing and luan you cannot see. By the time there is a visible stain on the ceiling, the damage behind it has usually been developing for months.
A reseal is a straightforward, affordable piece of maintenance. Structural rot repair means opening up the wall or roof, cutting out and replacing rotted framing, and rebuilding — a dramatically bigger job. The entire point of inspecting now is to stay on the cheap side of that line.
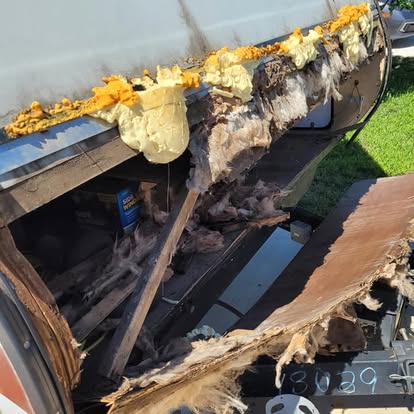
An actual customer job: rot behind the wall from a roof leak that started as a hairline crack in sealant.
Standing water is not required. RVs in covered storage still develop roof leaks. Sealant degrades from heat and UV whether or not it ever gets rained on, and a stored rig gets checked less often — so problems go unnoticed longer.
The Six Places to Inspect
Work slowly and check every one of these. A roof that looks fine from twenty feet away can have three separate failures up close.
- 1
Front and rear roof seams. The joints where the roof membrane meets the front and rear caps take the most flex while you drive and are the most common failure point on any RV.
- 2
The air conditioner gasket. The foam gasket under the rooftop A/C compresses and hardens over time. It is a frequent source of slow leaks that show up as staining on the ceiling right around the unit.
- 3
Vents, fans, and skylights. Every roof penetration is sealed with a bead of lap sealant that shrinks and cracks under UV. Skylight domes themselves also go brittle and yellow in Texas sun, and a cracked dome will not hold water out no matter how good the sealant is.
- 4
Refrigerator and plumbing vents. Smaller penetrations get overlooked precisely because they are small. They leak just as readily as the big ones.
- 5
The antenna, satellite, and solar mounts. Anything bolted through the roof is a hole in the roof. Solar installations in particular add several new penetrations that need checking.
- 6
Edge and awning rail trim. Run the full length of both sides. The screw line along the awning rail and drip edge is a classic slow-leak path into the sidewall, which is where delamination starts.
Before You Climb Up There
Not every RV roof is walkable. Plenty of travel trailers have roofs that are not rated to carry a person, and stepping on the wrong spot can crack the membrane or damage the decking — turning an inspection into a repair. Check your owner manual first. If the roof is not rated for walking, use a ladder from the side and work around the perimeter, or have someone come look at it who has the right equipment.
Go up in the morning while it is cool. Roof membrane gets soft and easy to damage in afternoon heat, and a Texas roof in July is genuinely hot enough to hurt you.
Sealant: Getting It Right Matters More Than Getting It Done
A large share of the leaks we get called out for come from a previous repair done with the wrong product. Three rules worth knowing:
- Self-leveling for horizontal, non-sag for vertical. Self-leveling lap sealant flows out to seal flat surfaces and is what belongs around roof penetrations. On a vertical surface it will run and leave the seam thin. Non-sag stays where you put it.
- Match the sealant to your roof membrane. EPDM, TPO, and fiberglass are different materials with different chemistry. A sealant that bonds beautifully to one may not bond at all to another, and some products will actively degrade the membrane over time.
- Do not use household silicone. Ever. It does not bond to RV roofing, it fails quickly in UV, and it leaves a residue that makes proper resealing harder later. It is the single most common mistake we find, and it usually means the area has to be scraped clean and redone from scratch.
Prep matters as much as product. New sealant applied over old, failing, dirty sealant will not bond properly and will fail again — often within a season.
Warning Signs You Already Have Water Intrusion
If you notice any of these, the roof needs looking at now rather than at the end of the season:
- Soft or spongy spots in the ceiling, walls, or floor
- Brown water staining around vents, skylights, or the A/C
- A persistent musty smell that does not air out
- Wallpaper, paneling, or trim separating at the seams
- Bubbling or rippling on the exterior sidewalls (delamination)
- Sealant that is cracked, chalky, lifting at the edges, or missing entirely
You can see what water intrusion actually looks like at each stage in our job photo gallery — including the before, during, and after of the rot repair pictured above.
When to Bring in a Tech
Touching up a short section of cracked lap sealant is reasonable DIY work if your roof is walkable and you have the right product. Call someone when the scope is bigger than that: if the sealant is failing across the whole roof, if you have found a soft spot, if there is staining inside, if the A/C gasket needs replacing, or if you simply are not sure what you are looking at.
This is also work that suits mobile service well. Roof inspection and resealing gets done wherever your RV sits — your driveway, a storage lot, or your campsite — with no need to tow the rig anywhere or leave it at a dealership for weeks. Impact RV Repair covers Kyle and everywhere within 50 miles, including Buda, Austin, San Marcos, New Braunfels, Canyon Lake, Bastrop, Dripping Springs, and Wimberley.
Get Your Roof Checked Before the Rain Does It For You
A roof inspection and reseal now costs a fraction of what rot repair costs later. Call Impact RV Repair at 512-968-5258 to get on the schedule for on-site roof service anywhere in the Kyle and Austin area — before fall camping season starts.
Serving Kyle, Buda, Austin, San Marcos, New Braunfels, Canyon Lake, Bastrop, and Central Texas within 50 miles of Kyle with on-site RV repair and maintenance. Mon–Sat, 8am–6pm · 512-968-5258